
Upgrading your car stereo involves selecting a compatible Select In-Car Infotainment system tailored to your driving needs, from safety and user-friendliness to multimedia capabilities. Prepare by gathering tools, uninstalling the old stereo, and inspecting your dashboard. Install the new system, connecting it to your vehicle's electrical system and pairing with your smartphone for AI assistance. Test all functions thoroughly and calibrate audio settings for personalized sound quality while ensuring driver safety through advanced in-cabin tech.
Looking to upgrade your car’s audio experience? Replacing your car stereo is a project that pays off in sound quality and modern features. This guide walks you through the process from start to finish, ensuring a smooth transition. First, understand your current setup and research the best Select In-Car Infotainment system for your needs. Then, prepare your vehicle and tools before uninstalling the old stereo. Follow our detailed installation steps and testing tips to enjoy your new in-car entertainment system promptly.
- Understanding Your Current Car Stereo and Its Components
- Researching and Selecting the Right In-Car Infotainment System for Your Needs
- Preparing Your Vehicle for Installation: Gather Tools and Materials
- Uninstalling the Old Stereo: Step-by-Step Guide
- Installing Your New In-Car Infotainment System: A Detailed Walkthrough
- Testing and Calibrating Your Newly Installed Car Stereo
Understanding Your Current Car Stereo and Its Components
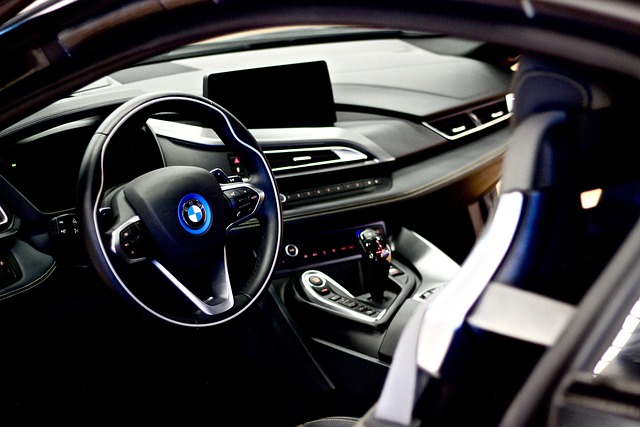
Before you embark on replacing your car stereo, it’s crucial to understand the components and functionality of your current system. Your car stereo is more than just a device for playing music; it’s part of your vehicle’s in-cabin technology ecosystem. This includes features like radio reception, CD or DVD playback, aux inputs, Bluetooth connectivity for hands-free calling and streaming, and potentially advanced functions like navigation or integrated music visualization displays.
When considering a replacement, look for the latest in-cabin technology that aligns with your needs and driving style. A family-friendly car infotainment system, for instance, might prioritize safety features, intuitive user interfaces, and robust connectivity options to keep everyone entertained during long trips. Ensure the new stereo seamlessly integrates with your existing vehicle’s hardware and offers the necessary connections for your devices and media sources.
Researching and Selecting the Right In-Car Infotainment System for Your Needs

When it comes to replacing your car stereo, one key step is researching and selecting the right in-car infotainment system. This involves understanding your specific needs and preferences. Consider what features are essential for you—like navigation, hands-free calling, or advanced multimedia car entertainment system capabilities. Think about the type of music visualization displays you’d like to have and the overall user experience you desire.
The latest in-cabin technology offers a range of innovative options from touchscreens with voice control to integration with your smartphone for seamless streaming and app access. Evaluate these features against your budget and vehicle compatibility to make an informed decision. This process ensures you don’t just replace your stereo, but upgrade your driving experience with the best in-car infotainment system tailored to your requirements.
Preparing Your Vehicle for Installation: Gather Tools and Materials

Before you begin replacing your car stereo, it’s crucial to prepare your vehicle properly. Start by gathering all the necessary tools and materials, including a new in-car infotainment system that suits your needs. Consider features like advanced driver assistance, customizable dashboards, and an immersive in-car entertainment system for a modern driving experience.
Make sure you have everything ready—from screwdrivers to cable ties—to ensure a smooth installation process. Double-check that your vehicle’s electrical system is off, and prepare the space by removing any existing components carefully. This meticulous preparation will not only make the job easier but also guarantee a secure fit for your new car stereo.
Uninstalling the Old Stereo: Step-by-Step Guide

Uninstalling your old car stereo is a crucial step when looking to replace it like a pro. Start by locating and identifying all wiring connectors associated with your current stereo system. These might include power, signal, and antenna connections. Next, using a screwdriver or specialized tools, carefully loosen and detach each connector from the stereo and the vehicle’s wiring harness. It’s important to do this methodically, taking note of where each wire belongs, as misplacing them can lead to installation headaches later.
Once all connectors are released, gently pull the old stereo out of its mounting location. Be mindful of any brackets or mounts securing it in place. After removal, inspect your car’s dashboard for any remnants of the previous setup, including wires or adhesive. This step ensures a clean slate for your new select in-car infotainment system, allowing you to install it with precision and achieve that coveted premium sound quality in cars. Remember, proper uninstallation paves the way for seamless integration of your new digital cockpit display and even wireless charging pads, making your car’s interior both modern and functional.
Installing Your New In-Car Infotainment System: A Detailed Walkthrough

Installing a new in-car infotainment system is an exciting upgrade for any vehicle, offering advanced features and a modern driving experience. Whether you’ve chosen a high-end car entertainment system or a touchscreen infotainment console with AI assistants, the process involves careful planning and execution.
First, ensure your vehicle’s layout is compatible with the new setup. You might need to remove the old stereo and adjust panel gaps accordingly. Next, connect the system to your car’s electrical system, following the manufacturer’s instructions. Modern in-car AI assistants often require pairing with your smartphone for voice control and app integration. Once installed, test all functions, including audio playback, navigation, and any additional features like Bluetooth connectivity or Apple CarPlay/Android Auto integration. This detailed walkthrough ensures a seamless transition to your new in-car infotainment system.
Testing and Calibrating Your Newly Installed Car Stereo
After successfully installing your new car stereo, it’s crucial to ensure optimal performance and seamless integration with your vehicle. The next step is testing and calibrating your newly installed infotainment system. Start by powering on the stereo and familiarizing yourself with the interface—navigate through the menus, adjust the settings, and verify that all functions are operational. Ensure the display is clear and bright, audio quality is crisp, and any connected devices like smartphones or tablets sync flawlessly.
During calibration, you’ll want to fine-tune the system for the best possible sound experience. This often involves adjusting equalizers, bass levels, and treble settings to match your preferences and the vehicle’s acoustics. Some advanced systems even offer driver safety monitoring features, leveraging the latest in-cabin technology to ensure a secure and enjoyable journey. Remember, a well-calibrated stereo enhances both the entertainment value and overall driver safety.
Replacing your car stereo can seem daunting, but with the right preparation and a step-by-step approach, it’s a manageable DIY project. By understanding your current system, researching the best new fit for your needs, and following the detailed installation guide, you’ll have a top-notch in-car infotainment system in no time. Remember to test and calibrate for optimal sound quality, ensuring a seamless transition from old to new.